Sunday, December 23, 2012

How To Make a Christmas Tree

Hey, everybody!

I guess by now you've managed to get yourself into the Christmas spirit and you are ready to start wrapping presents and decorating your home for Christmas. I thought of a simple "how to?" for you to celebrate the occasion. Maybe you are tired of cleaning after your Christmas tree every year when holiday fever is over, or maybe you don't have enough space in your apartment for a real or fake Christmas tree, or simply want something fresh this year. I wanna show you how to make a Christmas tree from cloth and tinsel, no bigger than a milk bottle that you can place anywhere in your home and won't leave you cleaning the house. You can reuse it every year or offer it.

Here's what you need:
  • two pieces of felt the size of an A4 paper (I got mine at a local supermarket, but you can find it in a stationary, or in a dry goods store)
  • an A4 paper
  • a pair of scissors
  • tinsel and beads

Step 1

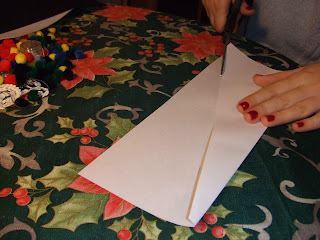
You need to make a model and then place it onto the felt to cut the shape of your Christmas tree. Take your A4 paper and fold it in half. Then fold again on the diagonal of one half to create the side of the Christmas tree. After that fold again and cut. At the end you should have an isosceles triangle.


Step 2

Place your model on top of the two sheets of felt and pin it so it doesn't move when you cut. Then cut along the model.


Step 3

Sew the two pieces of felt together with your sewing machine or by hand. Put black thread on top and white thread down so that the thread doesn't show on the two pieces of felt. If you sew by hand, choose a thread that makes a nice contrast (silver, or gold). Sew only on the sides, about 2 cm from the margins. Do not sew the bottom of the tree.


Step 4

It's time to sew the beads on, by hand. Find your beads and tinsel at a local dry goods store or get them from old necklaces or dresses.


Step 5

Cut triangles with your scissors without cutting into the hemline. This will make your tree even more realistic. Wrap the silver tinsel around the tree.

Step 6

Place the tree on top of a water bottle or a deodorant and then show it off :))


Have a lovely Christmas! 

Sunday, December 16, 2012

My Knitted Christmas

Two  of my most favourite activities around this time of year involve making Christmas decorations and wrapping presents. My theme this year is tiny bows made of tartan and wool, ethnic ribbons,white cotton lace and yarn pom-poms.

This is my special way to wish you all: "Happy Holidays" and a better New Year!


Monday, November 19, 2012

How To Make a Cloud Pillow

Let's kick start this week with a tutorial on cloud pillows :) something very easy to do and very trendy if you will.

You need:
  • a piece of fabric (dimmensions differ depending on how big you want your pillow to be. I used half a meter of fabric and folded it in two to make my small-medium cloud pillows)
  • a pair of scissors
  • needle and thread
  • your sewing machine (however if you have the patience and don't have the machine, you can make it by hand)
  • measuring tape
  • a pencil, or marker, or chalk, whatever you feel comfortable with
  • pillow stuffing
You can buy all these (except for the sewing machine) at a local dry goods store.


pillow stuffing

Step 1:
Take your piece of fabric and fold it in two. Draw a cloud with the pencil, or marker or chalk, whatever you have near you.


Step 2:
Use the scissors to cut along the trace you've made leaving about 1 cm distance between the pencil mark and your cut.


Step 3:
Sew the two pieces of fabric together with your sewing machine (choose the basic stitch). Follow the trace you've made with the pencil, or the chalk. Don't forget to leave a space of around 10 cm or less. Do not sew that space because it will help you turn your pillow around and put the stuffing inside


Step 4:
To prevent the fabric from clamping, one should relieve the tension by cutting into that 1 cm space you left when you cut the shape of the cloud. Cut into it, without penetrating the seam.


Step 5:
Using the 10 cm space you left turn your fabric inside out. It should look like this (the seam is not visible):


Step 6:
It's time to put the stuffing in. I used about 200 grams of stuffing for a medium cloud-pillow but it depends how stiff you want your pillow to be. You will use the 10 cm space to fill your pillow with stuffing.


Step 7:
When you're through with the stuffing, sew the 10 cm space as close to the edge of the fabric as you can.


Here are my cloud-pillows:


My little ballerina seems to be enjoying herself :)


Sunday, November 11, 2012

Mint Afternoon


A dress fit for a lady in the revelation-colour of this season - mint. Heavy embroidery around the neckline. Grey, white, black beads sewn by hand.
Made from a slightly elastic fabric that contains wool.
Size M, knee length.
Unique. Cannot be redone.

(sold)


Rochie in culoarea aceea stranie si care da dependenta - nici turcoaz, nici vernil, nici bleu - menta! brodata cu lana si zeci de margele. Marime M
Unicat


Rochie usoara, dintr-un voal ca spuma marii, cu broderie bogata asimetrica, in zona decolteului. Desi fotografiile nu o releva, rochia a fost vopsita si prezinta degradeuri placute, asemanatoare nuantelor apelor marii. 
Unicat.
sold


Rochie din combinatie de materiale si texturi
Unicat
sold